The packaging industry always needs new ideas and creativity to keep up with changes. Custom packaging is a game-changer. It helps businesses uniquely present their products. Magnetic closure boxes wholesale is a popular choice for luxury packaging. Many people choose them. Businesses love these boxes because they have attractive and functional packaging.
The Allure of Magnetic Closure Boxes Wholesale
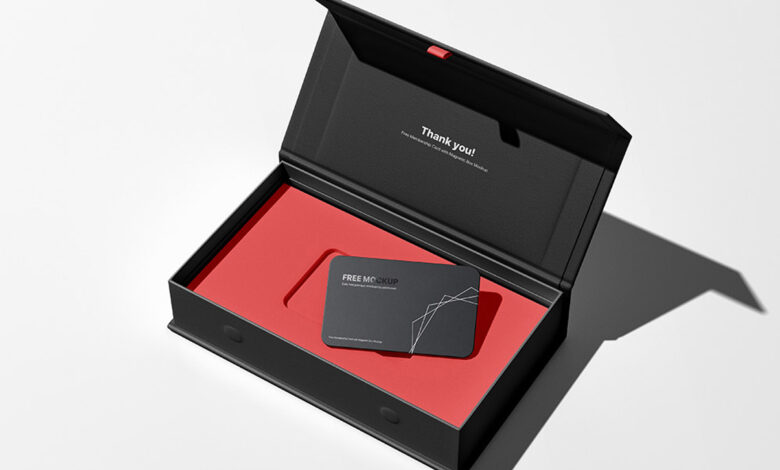
As the name suggests, Custom Boxes Wholesale comes with a magnetic closure mechanism. This feature ensures the product’s safety inside and adds a touch of luxury to the packaging. Imagine getting a product in a special package that closes with a satisfying snap. The experience is premium, making it a preferred choice for high-end products.
The Versatility of Custom Box Packaging
The beauty of custom box packaging lies in its adaptability. No matter what you’re selling, there’s a box made for you. Magnetic Box Manufacturers have noticed a demand for various types of packaging. So, they have added more options to their products. Custom boxes are unique because they are both functional and appealing. You can adjust them to fit any product, like jewelry or tech gadgets, to keep it safe.
Sustainable Choices: Custom Kraft Boxes
In today’s conscious world, sustainability is a significant concern. Custom-Printed Magnetic Boxes have emerged as a solution to this challenge. Kraft paper makes these boxes. They are biodegradable and recyclable, so they are a great packaging option. Custom kraft boxes are elegant, especially with magnetic closures. On the other hand, businesses can now meet the needs of eco-conscious customers while maintaining packaging quality.
The Future of Custom Printed Product Packaging
The demand for personalized experiences is on the rise. Consumers today value products that resonate with their style and preferences. Businesses can create custom packaging with their brand identity to meet customer preferences.
We design custom boxes with a sleek and premium feel to meet this demand. More businesses are realizing the importance of Magnetic Closure Boxes Wholesale and this will lead to an increase in custom packaging.
In conclusion, the world of packaging is evolving at a rapid pace. Custom boxes are leading the way in this revolution of packaging solutions. These boxes are unique because they combine functionality, aesthetics, and sustainability. They help businesses showcase their products.
If you’re starting a new business or already have a brand, you can use magnetic boxes for packaging. However, they will help your products stand out. They encapsulate the essence of modern packaging – functional, beautiful, and sustainable.
The Economic Benefits of Custom Magnetic Boxes
Businesses in the competitive market always seek affordable solutions without sacrificing quality. Magnetic Boxes Wholesale providers make it affordable for businesses to get custom boxes for packaging. Investing in custom boxes can lead to significant long-term savings. They don’t need to be replaced often thanks to their durability, which allows for reusing. The product feels nice, so businesses can charge more because it seems valuable.
Customization: Beyond Aesthetics
Custom-Printed Magnetic Boxes are appealing, but customization is not about looks. Moreover, the goal is to design packaging that matches the brand’s values and message. Custom-printed product packaging allows businesses to convey their brand story, ethos, and values. Brands can use special magnetic boxes to match their colors, logos, and branding. This way, the packaging represents their brand. This enhances brand recall and fosters a deeper connection with the consumers.
Meeting Consumer Expectations with Custom Packaging
Today’s consumers are well-informed and have high expectations. They seek products that offer value and omit quality and presentation. Magnetic Boxes Wholesale, such as custom kraft and magnetic boxes, meet these expectations. They offer a tactile and visual experience that standard packaging solutions can’t match.
People love getting gifts in magnetic boxes. It brings them joy and creates lasting memories. This often leads them to share their experience. Happy customers can share their unboxing experiences on social media, which benefits marketing.
Embracing Sustainability with Custom Kraft Boxes
Another benefit of magnetic boxes is to embrace sustainability which is no longer a buzzword; it’s a necessity. Businesses are under increasing pressure to adopt practices. Custom Magnetic Packaging with Logo offers a solution that’s both sustainable and stylish. These boxes show that sustainability and luxury can work together with magnetic closures. However, businesses can use these to lower their carbon footprint and attract customers.
Magnetic closure boxes wholesale is becoming popular in packaging because they are unique and practical. They represent the future of packaging – sustainable, customizable, and viable. Businesses will continue to look for new packaging solutions. Custom boxes will stay popular because of their many benefits.
The Role of Technology in Custom Magnetic Boxes Production
Advancements in technology have improved custom box packaging manufacturing. We can make magnetic boxes with precision using advanced machines and design software. Each box has secure closures and attractive graphics for consistent quality.
Furthermore, technology allows businesses to receive custom-printed product packaging more. This helps them meet the fast-paced demands of today’s market.
Enhancing User Experience through Thoughtful Design
One of the best standouts features custom boxes wholesale is that the user experience they offer is attractive. Therefore, opening a magnetic closure is satisfying. Moreover, a well-designed box is attractive. Finding the product inside is thrilling. Businesses can further elevate this experience by incorporating thoughtful design elements. The box could have textured materials, satin or velvet linings, or interactive elements.
The Competitive Edge with Custom Packaging
In a saturated market, standing out is crucial. Custom packaging, especially custom magnetic boxes, offers businesses that much-needed competitive edge. Eye-catching packaging stands out on shelves, attracting consumers away from competing products. Furthermore, high-quality materials enhance the value of a product. Moreover, this allows businesses to differentiate themselves and command higher product prices.
The Broader Implications for Branding and Marketing
Packaging is often the first physical touchpoint between a brand and its consumers. As such, it plays a crucial role in branding and marketing. Furthermore, with their premium appeal, magnetic boxes can enhance brand perception. However, when Custom Magnetic Packaging with Logo matches the brand’s message, it creates a consistent brand image.
Therefore, this consistency in branding can increase consumer trust and loyalty. Brands enjoy positive unboxing experiences shared by consumers on social media. This expands their reach and impact.
The Environmental Impact and Responsibility
Custom kraft boxes are good for the environment. Yet, by sourcing materials, a business can lower its carbon footprint. Moreover, to avoid filling up landfills, use boxes made of recyclable or biodegradable materials. Additionally, businesses can go further by using soy-based inks for printing. This helps reduce their environmental impact.
Custom Magnetic Boxes in the E-commerce Era
E-commerce has changed the way companies package products. Packaging needs to look good and be strong enough to handle shipping. With their sturdy construction, custom boxes are well-suited for this challenge.
Their Magnetic Closure Boxes Wholesale ensure that the contents remain secure during transit. Besides, when they unbox their purchases, it can feel like they are in the store. This makes online shopping more fun and personal for shoppers.
Custom boxes are not only for packaging but also valuable business tools. Therefore, the brand’s main goals are to make users happy, save money, and help the environment. Magnetic boxes are important in packaging as the industry evolves. They are now considered a crucial part of modern packaging solutions.